#1 Scooter Pie Recipe – Indulge in a Rich and Creamy Delight
Welcome to my scooter pie recipe, a classic dessert that has been enjoyed for generations. As a baker, I have been making these delightful treats for years and never get tired of sharing them with my family and friends.
If you are looking for a dessert that is both easy to make and mouth-wateringly delicious, then this recipe is for you. These pies are perfect for any occasion, whether it’s a family gathering or a cozy night in. Their creamy marshmallow filling sandwiched between two graham cracker crusts will leave you wanting more.
As an added bonus, this recipe includes variations such as the pumpkin scooter and boozy pumpkin scooter pies that are perfect for fall gatherings. Plus, if you’re feeling adventurous, try making your own graham cracker crumbs from scratch to elevate the taste even further.
So, sit back and enjoy the process of making these delectable treats. I guarantee your taste buds won’t be disappointed!
Why You’ll Love This Recipe

Welcome to the wonderful world of pies, where every slice is a delectable delight! Pies have been a staple dessert in almost every culture on the planet, and for many good reasons. They are incredibly versatile and can satisfy any taste bud, from sweet to savory. And today, I present to you one such pie that will take your taste buds on a ride that you’ll never forget, the Scooter Pie!
There are so many reasons why you’ll love this recipe. Firstly, it’s easy and quick to make; you can whip up a batch of these heavenly pies in no time. Secondly, it’s made with simple and everyday ingredients that won’t break the bank. Thirdly, the Scooter Pie is a classic dessert that has been enjoyed by generations of people in New England and beyond.
This dessert is perfect for any occasion – be it a backyard BBQ, a birthday party or just an after-dinner treat. And with its delicious graham cracker crust and creamy marshmallow filling, it’s easy to see why this treat is such a crowd-pleaser. The best part? It’s so easy to customize this pie however you please; add some pumpkin spice for an autumnal delight or sandwich some cookies into the filling for an extra chewy texture.
So what are you waiting for? Try out this recipe and indulge in the goodness of homemade Scooter Pies. You won’t regret it!
Ingredient List
Before starting the making of the Scooter Pie recipe, make sure to collect all the required ingredients. Here is a list of everything you’ll need to make one 9-inch pie:
- Graham Cracker Crumbs: 1 and 1/2 cups
- All-Purpose Flour: 3/4 cup
- Granulated Sugar: 1/4 cup + 1 tsp
- Salt: 1/4 tsp
- Unsalted Butter: 3 tbsp, melted and cooled
- Milk: 1/4 cup
- Dark Corn Syrup: 1/4 cup
- Molasses: 1 tbsp
- Brown Sugar: 1/2 cup
- Cinnamon: 1 tsp
- Baking Powder: 1 tsp
- Baking Soda: 1/2 tsp
- Kosher Salt: a pinch
- Cold Water: 3 tbsp
- Unflavored Gelatin: 2 packs
- Pure Vanilla Extract: 2 tsp
For marshmallow filling:
- Egg Whites: 3 large eggs
- Light Corn Syrup: 1/4 cup
- Granulated Sugar: 3/4 cup
- Kosher Salt: a pinch
- Vanilla Extract: 2 teaspoons
For pumpkin scooter pies:
- Pumpkin puree: 15 oz can, not pie filling
- Pumpkin pie spice: 1 teaspoon
- Bourbon whipped cream: (optional)
- Cream Cheese (softened): 8 ounces
You can find most of these ingredients at your local supermarket. However, if you can’t find any or want substitutions, I will address in the next section.
The Recipe How-To

Now that we have all the ingredients ready, it’s time to make our Scooter Pies! Follow these simple steps to have your delicious homemade pies in no time.
Step 1: Preheat the Oven
Preheat your oven to 350°F (175°C) and lightly grease a baking sheet.
Step 2: Make the Crust
In a mixing bowl, combine 1 1/2 cups of graham cracker crumbs, 1/4 cup of granulated sugar, 1/4 teaspoon of kosher salt, and 6 tablespoons of melted butter. Mix until evenly combined.
Step 3: Form the Crust
Form the crust mixture into small circles using a spoon or ice cream scoop. Place them on the prepared baking sheet and flatten lightly with your fingertips.
Step 4: Bake the Crust
Bake the crust for about 10 minutes or until golden brown around the edges. Then remove from oven and let cool completely on a wire rack.
Step 5: Make the Filling
In a saucepan over low-medium heat, combine half a cup of milk, a teaspoon of pure vanilla extract, and two tablespoons of molasses. Heat up just before boiling point before removing from heat.
Then in a separate mixing bowl, whisk together two tablespoons of unflavored gelatin, one-third cup of cold water and set it aside for three minutes to allow the gelatin to soften. After this time, pour in hot milk mixture into softened gelatin and stir until dissolved.
Next, whisk together one cup brown sugar, two teaspoons cinnamon powder, half teaspoon baking soda and baking powder each, and one-fourth teaspoon salt in another mixing bowl until smoothly blend. Pour in previously concocted milk mixture with gelatin while simultaneously whisking together until becoming uniform. Let it cool at room temperature before transferring into another bowl or container with a lid. Place inside refrigerator overnight until firm.
Step 6: Assemble Scooter Pies
Once the filling has firmed up completely in the refrigerator, use a mixer or stand mixer fitted with paddle attachment to blend together at slow speed four ounces cream cheese, half teaspoon pumpkin spice seasoning powder, two teaspoons pure vanilla extract and half teaspoon kosher salt for three minutes straight or until turns creamy texture.
Then add five tablespoons light corn syrup while continuing mix for additional two minutes. Proceed by adding half of previous day-made filling content while also slowly beating at medium speed until perfectly smooth. Later on you may stop mixing whilst scooping one-fourth cup filling onto each cooled crust crafted earlier as if sandwiching cookies marshmallow filled scooters until all used up.
Seal them air tight between plastic wrappers then storing inside refrigerator.
Enjoy your delicious homemade Scooter Pies with family and friends during gatherings!
Substitutions and Variations

In the culinary world, there is always room for creativity and experimentation. That’s why I’m excited to share with you some substitutions and variations for the Scooter Pie Recipe.
– For a twist on the classic recipe, try substituting graham cracker crumbs with crushed Oreo cookies. It will add a chocolatey flavor and a fun texture to your pie.
– If you want to make this recipe vegetarian, substitute gelatin with agar-agar. Keep in mind that agar-agar sets much firmer than gelatin and may have a slightly different texture.
– For a boozy pumpkin scooter pie, add 2-3 tablespoons of bourbon cream to the marshmallow filling or pumpkin spice scooter pies. It will bring a warm and cozy feeling in every bite.
– Want to make a fluffernutter scooter pie? Swap the graham cracker crust for peanut butter cookie dough or add 1/2 cup of peanut butter to the marshmallow filling. It’s the perfect combination of sweet and salty flavors.
– If you are feeling creative, try making individual mini pies instead of one large pie. You can also use this recipe to make moon pies or sandwiched around whoopie pies. The possibilities are endless!
Remember that these substitutions and variations are merely suggestions, feel free to let your imagination run wild and experiment!
Serving and Pairing
Once you’ve made your delicious scooter pie, it’s time to enjoy it. The best way to enjoy a scooter pie is by serving it chilled directly from the fridge. You could also heat it in the oven or microwave for a few seconds, but be careful not to overheat it as this could cause the filling to melt.
Scooter pies are perfect for sharing with friends and family. You can serve them at potlucks or picnics, and they would make an excellent addition to any dessert table. They pair well with a variety of beverages like coffee, tea, hot chocolate, milk, or even RC Cola.
If you’re feeling adventurous, scoop up a spoonful of your favorite ice cream on top of your scooter pie! The cold and creamy texture of ice cream perfectly complements the sweetness of the filling in the scooter pie.
For a more indulgent serving option, drizzle warm caramel or melted chocolate sauce over the top of your scooter pie just before serving. This adds a touch of decadence that will make your dessert irresistible.
Whether you’re enjoying them as an after-dinner treat or sneaking a bite during snack time, scooter pies are perfect when you need something sweet and satisfying.
Make-Ahead, Storing and Reheating
Now that you have made your delicious scooter pie, what’s the best way to store and reheat it for the next day? The good news is that this pie can be prepared ahead of time, which makes it a great option for a hassle-free dessert.
To make it ahead of time, store it in an airtight container or wrap it tightly with plastic wrap and then aluminum foil. You can store this pie at room temperature for up to 2 days, but alternatively, you can also refrigerate for up to 5 days or freeze for up to 2 months.
When you are ready to enjoy your scooter pie again, simply heat it in the oven or microwave until warm. If microwaving, opt for a lower power setting for even heating without melting the marshmallows too quickly.
One thing to keep in mind when reheating an entire scooter pie is to ensure that the fillings are fully heated and melted throughout without burning any parts of the crust. Alternatively, if you only want to enjoy individual slices, reheating them in a toaster oven is a great option as well.
As with any dessert, scooty pies tastes best fresh out of the oven. However, this recipe offers plenty of options for storing and reheating so you can enjoy them whenever you want!
Tips for Perfect Results
Now that you have all the ingredients and the recipe in hand, let’s dig deeper into some tips to make sure you get the perfect scooter pie results!
1. Use fresh ingredients:
Using fresh ingredients makes a huge difference in the taste of your scooter pie. Check the expiration date on all ingredients, especially baking powder, baking soda, and unflavored gelatin. Old or expired ingredients can affect the texture and flavor of your pie.
2. Cooling and Chilling:
Temperature control is crucial when making a perfect scooter pie, so it’s essential to give enough cooling time to each layer, which will help to set the next one just right. Wait until each layer is completely cool before adding another layer of filling and before assembly.
3. Be Patient:
It’s important to be patient and let your pie cool gradually at room temperature after taking it out of the oven; avoid putting it straight into the refrigerator. Rapid changes in temperature can cause cracking on top of your pie.
4. Pre-Bake Your Crust:
To prevent a soggy bottom crust, bake your crust before adding the filling. Pre-baking helps to form a barrier between the crust and filling, creating a crumbly crust with a delicious crunch.
5. Play With Flavors:
Scooter pies are versatile and can go in any direction from classic to modern twists, try experimenting with different flavors of graham crackers or cookies for your crusts or adding spices like pumpkin spice or cinnamon for an autumnal twist. Experiment with different types of fillings- boozy pumpkin scooter pies? Fluffernutter scooter pies? The possibilities are endless!
6. Presentation Matters:
Take time to arrange toppings such as marshmallows, chocolate syrup, or whipped cream artfully on top for an aesthetically pleasing appearance that will make anyone who takes a slice feel like they’re having dessert at a five-star restaurant.
By following these tips, your homemade scooter pies will be truly unforgettable!
FAQ
As with any recipe, there are often questions that arise during the cooking and baking process. To ensure you end up with a perfect scooter pie, here are some frequently asked questions, along with their answers, that may help you in the kitchen.
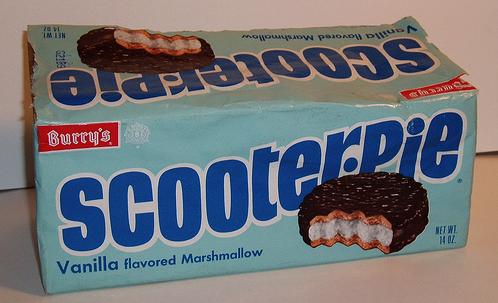
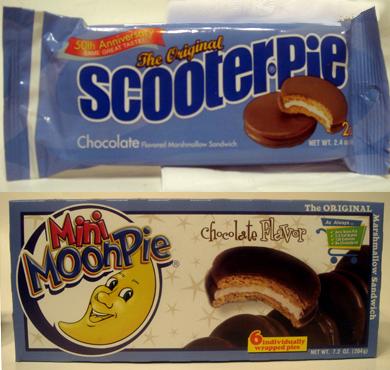
What is the difference between a scooter pie and a moon pie?
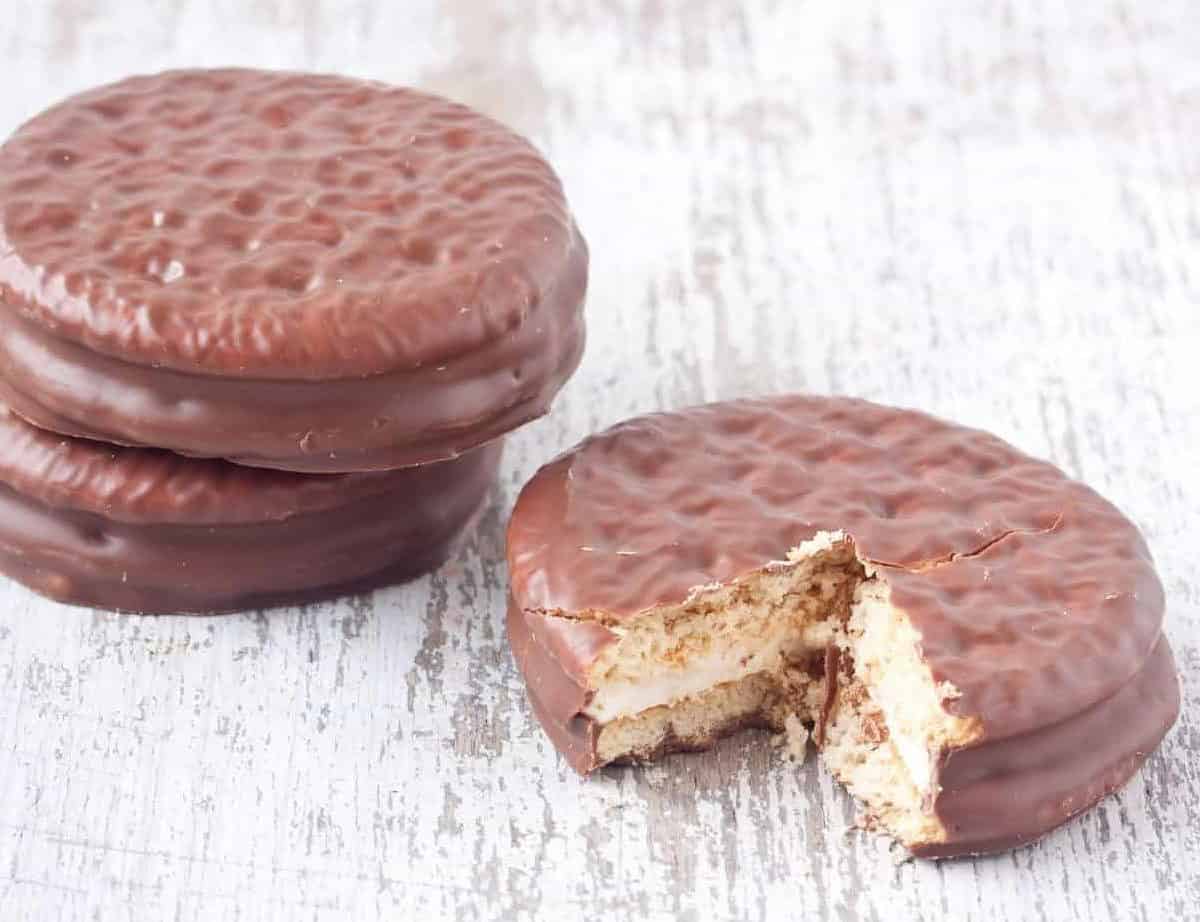
The sweet treats known as Scooter Pies are a type of Moon Pies that pay homage to a famous New York Yankees player with a catchy nickname. These delicious snacks consist of two crispy cracker layers housing a soft, gooey layer of marshmallow, all coated in a layer of rich chocolate.
What are the ingredients in original MoonPie?
For this recipe, we will need high-quality wheat flour, which is enriched with essential vitamins like Niacin B3, Reduced Iron, Thiamine Mononitrate B1, Riboflavin B2, and Folic Acid B9. We will also need other ingredients such as Invert Sugar, Real Corn Syrup, Real Sugar, Palm and Palm Kernel Oil, Water, Soybean Oil, Gelatin, Baking Soda, Corn Starch, Corn Sugar, Salt, Soy Lecithin, and Natural Flavor to give our finished product a delectable taste and texture.
What is another name for Moon Pies?
If you’re a fan of dessert, you might be familiar with a fluffy and moist cake-like treat known as whoopie pie. These delectable sweets are made of two cake-shaped cookies that hold a creamy and indulgent filling in the middle. They go by different names such as gobs, bobs, black-and-whites, and even “big fat Oreos” or “moon pies”, but they all contribute to the same heavenly experience.
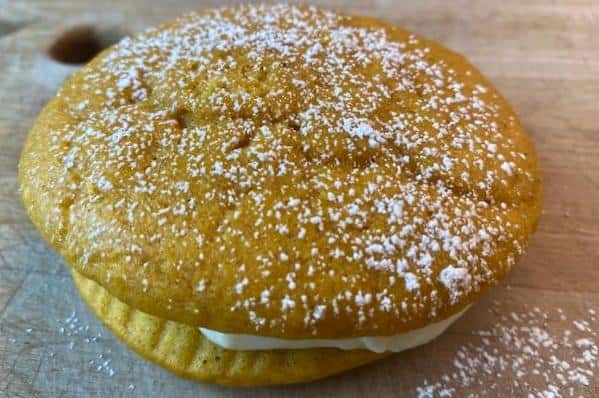
Are Moon Pies soft?
If you’re looking for a delectable treat that has roots in the southern state of Tennessee, you need to try making Homemade Moon Pies. These cookies consist of soft vanilla flavored layers encompassing a layer of gooey marshmallows. To top it off, they are then dipped in rich chocolate for an indulgent dessert experience. This recipe is a classic that has been enjoyed for generations.
Bottom Line
In conclusion, this Scooter Pie recipe is one that is sure to be a hit with anyone who tries it. With its perfect combination of graham crackers, marshmallows, and chocolate, it’s no wonder why moon pies and scooter pies have been a beloved snack in New England for decades. Plus, with the added bonus of being able to customize the fillings and flavors, this recipe can be adapted to suit anyone’s tastes.
So whether you’re making homemade whoopie pies, pumpkin-scooter pies, or the classic Moon Pies sandwiched around fluffernutter or Salerno cookies and covered in chocolate, this Scooter Pie recipe will not disappoint. And with tips for perfect results, substitutions and variations, make-ahead and storing instructions, and answers to frequently asked questions included in this article, success is guaranteed.
So go head on and try this delicious homemade Scooter Pie recipe today!
Scooter Pie Recipe
Ingredients
- 4 cups all-purpose flour
- 1 1/2 cups graham cracker crumbs
- 1 teaspoon salt
- 1 teaspoon baking soda
- 1 teaspoon baking powder
- 1/2 teaspoon cinnamon
- 1/2 cup brown sugar
- 1/4 cup molasses
- 1/4 cup cane syrup
- 1/4 cup milk
- 1 teaspoon vanilla extract
- 1 1/2 cups butter
- 3/4 ounce unflavored gelatin (three 1/4 oz. pkgs)
- 1 cup cold water, divided
- 12 ounces granulated sugar (about 1 1/2 cups)
- 1 cup cane syrup
- 1/4 teaspoon kosher salt
- 2 teaspoons pure vanilla extract
- 20 ounces ghirardelli dark melting wafers
Instructions
- Mix first six ingredients in a large bowl until thoroughly incorporated.
- In stand mixer beat butter until fluffy. Add sugar and extract to butter mixture and beat until incorporated. Add dry ingredients and beat until a crumbly mixture evolves. Add molasses and 1/4 cup cane syrup, then milk until the dough comes together so it is stiff. Chill dough for an hour.
- Preheat oven to 350 degrees. Turn out chilled dough onto a flour-dusted surface, then roll it until it is ¼ inch thick. Cut circles out with a cookie cuter or any implement that will give the size of the scooter pie you want.
- Bake until edges brown.about 15 minutes. Let cool completely.
- For the marshmallow filling:
- Place ½ cup of the water and the gelatin in the bowl of a stand mixer (use the whisk attachment for making the marshmallows).
- Combine the remaining ½ cup water, granulated sugar, 1 cup cane syrup and salt in a small saucepan. Place over medium-high heat, cover and let cook 3-4 minutes. Uncover, clip a candy thermometer to the pan and allow to cook until it reaches soft ball stage, or about 240’F (about 10 min).
- Once you reach this temperature, immediately remove the pan from the heat. Turn the mixer on low speed, and carefully pour the sugar syrup down the side of the mixer bowl into the gelatin. After adding all of the syrup increase the speed to high and continue to mix until it becomes very thick and fluffy (about 10 minutes). Add the vanilla about one minute before you are done beating the mixture.
- Give the mixture about 20 minutes to set up to the point where the weight of the top cookie will rest on the marshmallow without it oozing over the sides.
- Transfer the marshmallow filling to a large (gallon size) resealable plastic bag. Snip off one corner with scissors. Place half of the cooled cookies onto a sheet of parchment paper, and have the remaining cookies standing by.
- Squeeze a dollop of the filling onto each of the cookies on the parchment paper.
- Top with the remaining cookies, pressing lightly. Let set at room temperature for about two hours, or until the filling has set up.
- For the chocolate coating:
- Follow the directions on the melting wafers, or use 1 lb. bittersweet chocolate (61%–70% cacao) and find some instruction on tempering chocolate. (This is pretty hard to get right, so dipping chocolate can make a big difference).
- Submerge chilled cookies in the chocolate, using 2 forks to gently lift the sandwiches out of the bowl. Let stand until shell hardens.
Your Own Notes
Nutrition
Recommended Recipes Just For You

Steven is a chef by heritage, so it’s no wonder why baking is such a big part of who he is. To share his passion for all things sweet, he created cookiesncrepes.com. It’s the perfect platform to indulge in delicious treats, all with a sprinkle of his signature flare.