) “Savor the Taste of Homemade Picnic Bread with Our Recipe
Are you looking for the perfect addition to your next picnic basket? Look no further than this delicious and savory Picnic Basket Bread. This bread recipe is versatile and can be customized to fit any taste preferences or dietary needs.
Not only is this bread recipe incredibly tasty, but it’s also easy to make. You don’t have to be an experienced baker to create this perfectly soft and savory loaf of bread. All you need is a few ingredients, a mixing bowl, and an oven.
This recipe is perfect for packing in your picnic basket, whether you’re headed to the park, beach, or even just out to your backyard for a family gathering. The aroma of freshly baked bread will add the perfect touch to any outdoor event.
So why settle for boring store-bought bread when you could easily make something deliciously fresh and homemade? Get ready to impress your friends and family with this mouth-watering Picnic Basket Bread recipe.
Why You’ll Love This Recipe
Have you been searching for the perfect bread recipe to pack in your picnic basket? Look no further than this amazing Picnic Basket Bread Recipe. You’ll fall in love with its delicious flavor and versatility, making it an ideal option for any day out or summer gathering.
One of the reasons you’ll love this recipe is that it’s easy to make. With simple ingredients like flour, sugar, salt, and active dry yeast, you can have a fresh loaf of bread ready in just a few hours.
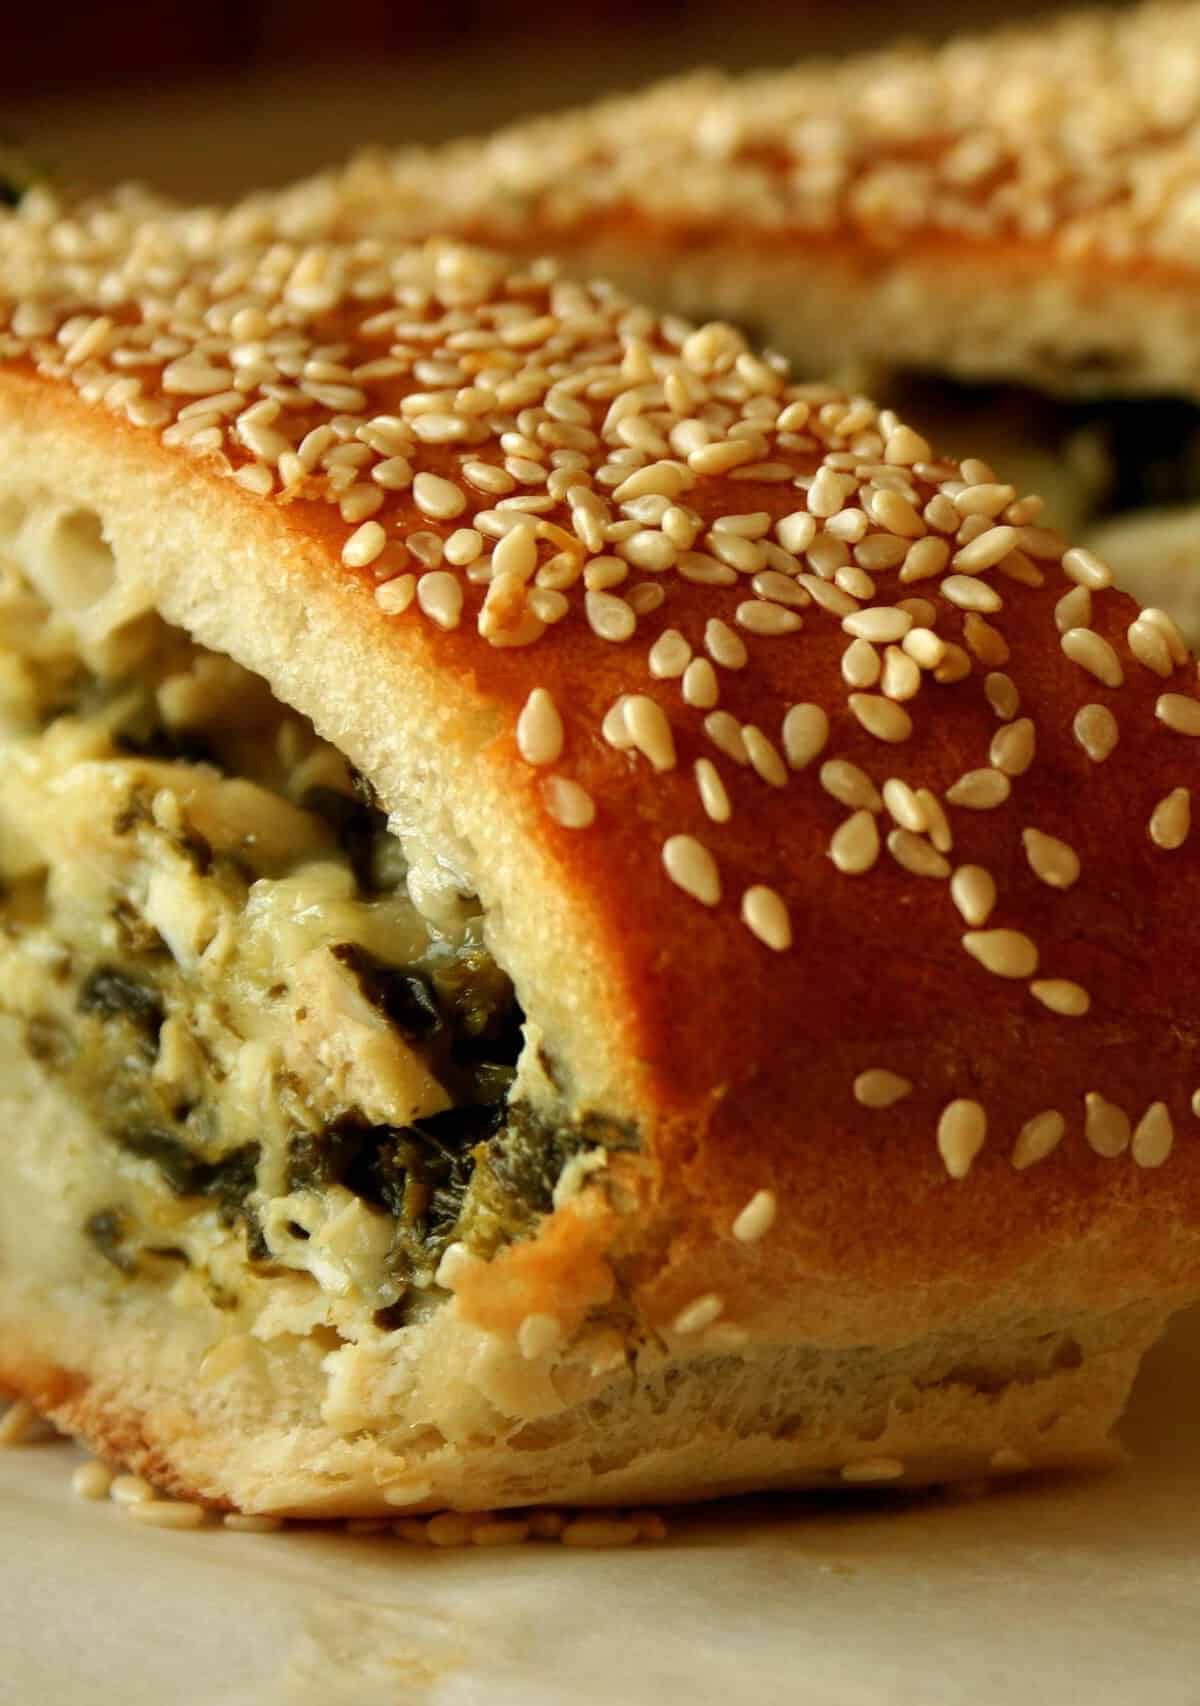
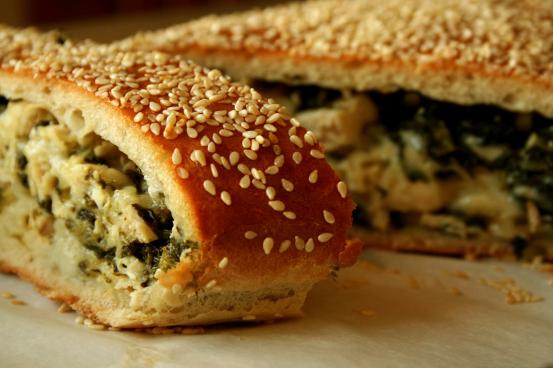
But it’s not just the simplicity of the recipe that makes it great; the combination of flavors is truly outstanding. The sweetness of the sugar is balanced perfectly by the savory onion, parmesan cheese, and sesame seeds. And don’t forget about the frozen chopped spinach and Swiss cheese, which adds a burst of healthy greens and richness to each slice.
Additionally, this bread recipe is incredibly versatile. It pairs well with a variety of foods, including picnic sandwiches made with roast beef or other delicious fillings. Plus, since it can be made ahead of time and stored easily, it’s perfect for any outdoor setting where convenience is key.
Whether you’re looking for an edible picnic basket centerpiece or just a tasty addition to your bread basket at home, this recipe will not disappoint. Give it a try and discover why it’s become our go-to choice for all picnic needs!
Ingredient List
Here are the ingredients you’ll need to make this delicious picnic basket bread recipe:
- 2 cups of flour
- 1 tablespoon of sugar
- 1 teaspoon of salt
- 1 package of active dry yeast
- 1/2 cup of warm water (around 110°F)
- 1/4 cup of sesame seeds
- 1/4 cup of grated Parmesan cheese
- 1/4 cup of frozen chopped spinach, thawed and drained
- 1/4 cup of diced onion
- 1 cup of shredded Swiss cheese
You may already have some of these ingredients in your pantry, such as flour and sugar. However, you might need to make a quick trip to the grocery store for others like yeast, sesame seeds, and frozen chopped spinach.
Make sure you have all the ingredients before starting the recipe to ensure a smooth baking process.
The Recipe How-To

Now that you have all the necessary ingredients for the Picnic Basket Bread, it’s time to get cooking!
Preparation:
- Preheat oven to 375ºF (190ºC).
- Thaw and drain the spinach. Set aside.
- Grease a 9″ x 5″ (23cm x 12cm) loaf pan.
- Mix together sesame seeds and onion salt in a small bowl. Set aside.
- Spread flour on your working surface.
Making the Dough:
- In a large bowl, mix flour, sugar, yeast, and salt.
- Add Parmesan cheese and Swiss cheese, Mix thoroughly.
- Combine with water and melted butter in the same bowl.
- Knead the mixture until smooth for about 15 minutes (Note:
It's important to knead it for this long time as it helps dough rise better) - Add in the spinach and mix it evenly into the dough.
Baking Process:
- Put the dough into a greased loaf pan, turn over once to grease top.
- Sprinkle sesame seed mixture over top of bread (Note:
You can switch up this step by using some other seasoning of your choice or just top it with plain sesame seeds) - Let rise until double in size for about 1 hour with a cover draped over the loaf pan in a warm place (Note:
If you're short of time or want to enjoy fresh bake bread every day, use “delay start” on your bread machine) - Bake at 375ºF (190ºC) for about 40-45 minutes or until golden brown (Note:
A perfect timing ensures that your bread is cooked thoroughly without burning out.)
Remove from the oven and let cool down in pan for 5 minutes before transferring onto a wire rack to cool completely.
Get ready to devour this scrumptious Picnic Basket Bread all alone or in combination with other dishes such as toast or sandwiches.
Enjoy!
Substitutions and Variations
Are you looking to mix things up with your picnic basket bread recipe? While this recipe is perfect as written, there are a few substitutions and variations you can make to tailor the bread to your taste.
One option is to switch up the cheeses. Swiss cheese gives the bread a nice nutty flavor, but you could try substituting with another hard cheese, such as cheddar or gouda. For a more savory twist, consider adding in some chopped onion or garlic to the dough.
If you’re looking for a healthier option, you could swap out the all-purpose flour for whole wheat flour or a gluten-free option like almond flour. You could also use fresh spinach instead of frozen chopped spinach – simply wilt it down first before mixing it in with the dough.
For those who love seeds, try adding in sesame seeds to give the bread an extra crunch. If you’re not a fan of parmesan cheese, experiment with different hard cheeses like asiago or pecorino romano.
In terms of serving and pairing, consider slicing the bread horizontally and using it as a base for homemade picnic sandwiches. Try adding roast beef and swiss cheese or ham and cheddar for a classic French sandwich. Or serve slices of the bread alongside dips like hummus or tzatziki for a party loaf that’ll be sure to impress.
No matter which variation you choose, this edible picnic basket will be the perfect addition to any picnic spread.
Serving and Pairing

Once you have made your delectable picnic basket bread, serving it up in style is the next step. This picnic bread is perfect for any occasion – be it a Sunday brunch, a lunchtime treat, or an evening snack.
The bread’s soft and fluffy texture and robust flavor makes it perfect as the main dish or side dish for meals. You can add some roast beef or turkey to create a delicious picnic sandwich that everyone will love.
You’ll also love how versatile this bread is when it comes to pairing with dishes. The earthy flavors of spinach and onions and the richness of Swiss cheese make the bread ideal for pairing with soups, salads, or stews. Roasted vegetable skewers pair excellently with this picnic basket bread because of its rustic flavor profile.
If you’re seeking a more decadent experience, you can pair this picnic basket bread with red wine or champagne at an evening gathering with friends or family. To make the bread even more special for such occasions, sprinkle it with sesame seeds, Parmesan cheese, or other toppings that complement the flavors.
The secret behind your perfect pairing with any dish lies within your creativity! Experiment with different ingredients to find your favorite combinations. The bread can also serve as the base for dips like hummus or guacamole. Slice and serve it on a charcuterie board to amaze your guests at any party!
In conclusion, there’s no wrong way to enjoy Picnic Basket Bread. Whether plain or paired with sides, it’s sure to satisfy every time!
Make-Ahead, Storing and Reheating
One of the great things about picnic basket bread is that it can be made ahead of time and stored until your picnic lunch. Simply allow your bread to cool completely, then wrap it tightly in plastic wrap or foil and store it in a cool, dry place for up to 24 hours.
If you need to store the bread for longer than a day, you can freeze it for up to one month. When ready to serve, simply thaw the bread at room temperature and give it a quick warm-up in the oven.
For reheating, slice the bread into thick slices and place them on a baking sheet. Toast them in a preheated oven at 350°F for about 10 minutes, or until lightly crispy on the outside and warmed through. You can also toast individual slices in a toaster oven or even in a pan on the stovetop.
Be mindful when reheating not to dry out the bread too much or overcook it. You want the crust to remain crispy while the inside stays soft and fluffy.
Picnic basket bread is a versatile recipe that lends itself well to being made ahead of time and stored or reheated as needed. This makes it perfect for picnics, parties, or even as an easy side dish for weeknight dinners at home.
Tips for Perfect Results

Baking is both an art and a science, and sometimes the smallest tweak can make a big difference. Here are some tips to ensure that your picnic basket bread comes out perfectly every time.
Firstly, make sure that you measure all your ingredients precisely. Baking is not the place for approximations or guesswork. Use measuring cups and spoons to get exact quantities of flour, sugar, salt and yeast. Too much or too little of any of these will significantly affect the taste and texture of your picnic basket bread.
It’s also important to use the correct size baking pan and temperature settings set on your oven according to recipe directions. The size of your pan can impact how evenly your bread bakes, and the wrong temperature can cause it to burn or not cook through.
Another essential thing to watch out for is how long you knead the dough. Kneading dough helps develop gluten, which lends strength and structure to the bread. But over-kneading can result in a tough, dense loaf, while under-kneading can lead to one that’s too soft and crumbly.
Additionally, when working with yeast for this picnic basket bread recipe, ensure that it is fresh and active dry yeast so as to allow sufficient rising for optimal texture. If in doubt about the freshness of your yeast or need more assurance that it would activate during baking, proof the yeast first by dissolving it in warm water before incorporating into dry ingredients.
A final tip for success is not to skip the resting time for this basket bread recipe. Allowing it some minutes to rest after taking it out ofthe oven will help seetle textures and flavours better making a delightful eating experience.
Follow these tips, pair your basket bread with your desired picnic sandwiches, wrap everything up neatly in a picnic blanket along with other snack items like chips dips or fruit skewers, and you’ve got yourself a perfect picnic spread.
FAQ
As you prepare to bake your own picnic basket bread and pack it with all of your favorite sandwich fixings, it’s natural to have a few questions. In this section, I’ll answer some frequently asked questions about this recipe to help you achieve the perfect loaf every time.
What is good bread for picnic?
When it comes to making sandwiches, it is best to use bread that is sturdy and can withstand the moisture from ingredients like vegetables, spreads, and salads. Hearty breads like ciabatta, baguette, or Italian-style loaves are the way to go. According to Andrea Slonecker, co-author of The Picnic, these thick and crusty rolls won’t get soggy and fall apart easily.
What should a picnic basket contain?
When preparing for an outdoor meal, there are certain essential items that you should always bring along. Firstly, it is important to ensure that cold foods stay chilled and hot foods remain warm. One useful trick is to pack frozen bottles of water to keep items like salads, sandwiches and dips cool. Furthermore, bringing along a corkscrew or bottle opener ensures that drinks will be easily accessible. To tidy up any messes or sticky fingers, moist towelettes are a must-have addition. Additionally, packing some basic seasonings like salt and pepper can greatly enhance the flavor of any meal. Another important item is paper towels, as they can be used for cleaning up spills and messes, as well as for protecting utensils and dishes from dirt and debris. A tray is also a helpful item to bring along, as it provides a flat surface for serving and prevents utensils, plates and cups from getting dirty on the ground. Lastly, don’t forget to pack serving spoons and a folding knife to assist in preparing and serving the food.
What to add to bread to make it more interesting?
When making dough, adding nuts, seeds, chopped dried fruits, olives, or fresh herbs like thyme or rosemary is a great way to enhance the flavor and texture. The good news is, you don’t have to change the dough recipe itself. Simply scatter your desired ingredients into the dough during the “knocking back” stage for best distribution.
Can you put a bread basket in the oven?
When it comes to baking bread, a proofing basket plays a crucial role in allowing the dough to proof properly. As the name suggests, proofing baskets are specifically designed for this purpose and cannot be used as a substitute for a baking tin. It’s important to note that proofing baskets should never be placed in the oven, as they are not meant for baking.
Bottom Line
In conclusion, I hope this recipe for picnic basket bread will help you add a special touch to your next outdoor gathering. With its delicious blend of savory ingredients and crispy texture, this bread is sure to be a favorite among your family and friends. Whether you’re planning a relaxing day at the park, a festive barbecue, or an elegant picnic, this bread is the perfect complement to any occasion.
Remember, if you want to make the most out of your picnic experience, preparing ahead is essential. Be sure to pack your bread in a sturdy basket, along with your favorite sandwiches, fresh veggies, and dips. And don’t forget to bring plenty of sunscreen and water to stay hydrated during the day.
I hope my tips for substitutions and variations, serving and pairing, make-ahead and reheating have made this recipe accessible for all levels of bakers. So what are you waiting for? Grab your ingredients and start baking! Whether you’re new to baking or an experienced chef, this recipe is easy to make and always turns out delicious.
Thank you for joining me in exploring the wonderful world of picnic basket bread. With so many variations to choose from, you’ll never run out of ideas for new creations. So go ahead and experiment with different flavors and combinations to create your own signature bread recipe. I’m sure it will be absolutely delightful!
Happy baking!

Picnic Basket Bread Recipe
Ingredients
- 1 (1/4 ounce) package active dry yeast
- 2 1/2-3 cups flour
- 1 tablespoon sugar
- 2 cups chopped cooked chicken
- 1 1/2 cups shredded swiss cheese
- 1 (10 ounce) box frozen chopped spinach, thawed and drained
- 1/4 cup grated parmesan cheese
- 1/4 cup finely chopped onion
- 1 beaten egg white
- 2 tablespoons sesame seeds (optional)
- 1 1/4 teaspoons salt
Instructions
- Preheat oven to 375°.
- Mix cheese, spinach, chicken, onion, and 1/4 teaspoon salt for filling.
- Set aside.
- Dissolve yeast in 1 cup warm water.
- Mix yeast mixture, sugar, 1 teaspoon salt, and 1 cup flour in a mixing bowl.
- Gradually add 1 1/2 cups flour to dough.
- Knead dough until smooth, using other 1/2 cup flour if dough is sticky.
- Roll dough into a 16 x 10-inch rectangle.
- Spread filling down the middle of dough.
- Bring dough edges together and seal.
- Place seam-side down on lightly greased cookie sheet.
- Brush bread with egg white and sprinkle with sesame seeds.
- Bake at 375° for 40 minutes.
- Serve warm, or cool and refrigerate.
Your Own Notes
Nutrition
Recommended Recipes Just For You
None found

Steven is a chef by heritage, so it’s no wonder why baking is such a big part of who he is. To share his passion for all things sweet, he created cookiesncrepes.com. It’s the perfect platform to indulge in delicious treats, all with a sprinkle of his signature flare.